

Expert in KVM & Remote Access solutions. BIOS-to-Text via SSH, data snapshots, and enterprise-grade remote management. Total control over your infrastructure.
Spain
Joined April 2026
- Tweets153
- Following396
- Followers344
- Likes142




Every remote access setup I've used made me pick one.
A remote desktop app is fast and great for daily work, until Windows freezes. Then it's gone, and so is your access.
A hardware KVM always works, even in the BIOS. But it's usually too laggy to actually work on all day.
So I stopped picking and built both into one thing.
USBridge runs a software agent for everyday use, with low latency and up to 4K 120 FPS. When Windows hangs or I need the BIOS, I switch to the hardware KVM in the same app. No second tool, no second login, no port forwarding.
It's the setup I wanted for my own machines, and it's finally at a point where I use it every day.
Software only, KVM only, or both? Curious what you're running right now
#homelab #selfhosted #buildinpublic #remoteaccess
Link for anyone curious: usbridge.io
The software client is free, the KVM starts at $84. Ask me anything about how it works.
#sysadmin #hardware #KVM

USBridge Amir Fatkulin retweeted
Anyone who runs a homelab is familiar with this scenario.
You’re away from home, and your server stops responding. Remote access is down, SSH times out—and the only way to fix it is to physically press the power button.
That’s exactly why I created the USBridge KVM 2.0.
The device connects to any PC via HDMI and USB, letting you control it—viewing the screen and using the keyboard and mouse—directly from your smartphone or laptop. This isn’t just another remote desktop app; the system operates at a level below the operating system itself. You get access to the BIOS and boot menu, you can "revive" a frozen Windows instance, reinstall the OS from an ISO image, or even trigger the power button (by connecting to the ATX motherboard).
And there’s no need to configure port forwarding—the connection is handled via Tailscale.
#homelab #selfhosted #buildinpublic #hardware
Anyone who runs a homelab is familiar with this scenario.
You’re away from home, and your server stops responding. Remote access is down, SSH times out—and the only way to fix it is to physically press the power button.
That’s exactly why I created the USBridge KVM 2.0.
The device connects to any PC via HDMI and USB, letting you control it—viewing the screen and using the keyboard and mouse—directly from your smartphone or laptop. This isn’t just another remote desktop app; the system operates at a level below the operating system itself. You get access to the BIOS and boot menu, you can "revive" a frozen Windows instance, reinstall the OS from an ISO image, or even trigger the power button (by connecting to the ATX motherboard).
And there’s no need to configure port forwarding—the connection is handled via Tailscale.
#homelab #selfhosted #buildinpublic #hardware
USBridge Amir Fatkulin retweeted
I turned my Nano KVM into an ultra-fast powerhouse using custom USBridge firmware!
My goal was to push this hardware to its absolute limit and unlock its full potential for system engineers. Here is what I've packed inside:
⚡ Ultra-low latency
🌐 Seamless USBridge ecosystem integration
🔊 Audio pass-through & gamepad support
🔒 Built-in Tailscale for secure remote access
💿 Virtual ISO media support & terminal BIOS access
Transform these little guys into the ultimate engineering tool!
#homelab #nanokvm #usbridge #kvm #radxazero3w #tech #embedded #sysadmin #customfirmware
I turned my Nano KVM into an ultra-fast powerhouse using custom USBridge firmware!
My goal was to push this hardware to its absolute limit and unlock its full potential for system engineers. Here is what I've packed inside:
⚡ Ultra-low latency
🌐 Seamless USBridge ecosystem integration
🔊 Audio pass-through & gamepad support
🔒 Built-in Tailscale for secure remote access
💿 Virtual ISO media support & terminal BIOS access
Transform these little guys into the ultimate engineering tool!
#homelab #nanokvm #usbridge #kvm #radxazero3w #tech #embedded #sysadmin #customfirmware
Download firmwares and test them out: usbridge.io/hardware-agent

When you’re building devices based on Radxa Zero-format boards, you eventually realize—after a long, fruitless search for a suitable heatsink—that nothing appropriate actually exists. You have to design everything from scratch. On top of that, I was running out of 3D-printed enclosures. I also wanted to make a few minor, purely cosmetic tweaks: shifting the buttons by just a millimeter and generally "polishing up" the design.
I went to Telegram to message the engineer I’ve been working with, only to find his account... completely deleted. (I truly hope he’s alright, wherever he may be.)
Seeing me panic, my girlfriend offered to help: "Let me take a quick look! I’m quite proficient in Blender; I’m sure I can figure out your FreeCAD setup." Imagine her surprise when, after 30 minutes of wrestling with the FreeCAD interface, she realized that even a task as simple as removing a single extraneous protrusion wasn't just a matter of a few clicks—it was an entire ordeal. The FreeCAD interface is an absolute nightmare.
After some thought, we decided to test a brilliant idea: connecting Claude via the Model Context Protocol (MCP). I found an open-source repository on GitHub - github.com/neka-nat/freecad-… (sharing the link in case it’s useful to anyone else).
Folks, it’s nothing short of magic.
In just 10–15 minutes, Claude handled everything we needed. It verified the button placement and redesigned the heatsink for the new version. My girlfriend was absolutely thrilled.
So, now I have a finished STEP file in hand. But that raises a question: should I send it off to the factory and wait two weeks? That doesn't sound like a great option. In the end, I just went ahead and ordered a 3D printer—now I’m waiting for it to arrive so I can finally print everything out. From now on, I’ll be able to make enclosures for any of my DIY electronics projects.
#FreeCAD #ClaudeAI #3Dprinting #Hardware

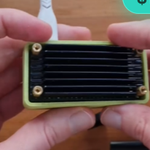
I’ve come up with two versions of a heatsink, and now I’m racking my brain trying to figure out which one will perform better in practice. If the KVM switch is positioned vertically—with the cable connectors facing upward—natural convection should be more effective at venting hot air out through the channels. On the other hand, longitudinal fins provide a somewhat larger total surface area, and I also just happen to prefer how they look.

Previously, I outsourced the production of enclosures and buttons for the USBridge to third-party companies using SLS technology. While the quality was acceptable, the long lead times and high cost per unit slowed down the design refinement process and limited flexibility when producing small batches. Consequently, I decided yesterday to bring the entire production process in-house!
I’ve ordered my first 3D printer—an Anycubic Photon Mono 4 (featuring 10K resolution and a 17-micron pixel size). Now, I’ll be able to verify CAD model revisions, button tolerances, and PCB clearances in just a few hours, all while maintaining full control over quality.
For my initial tests, I’ve chosen Anycubic ABS-Like Resin Pro 2, which should offer the necessary heat resistance. If any heating issues arise during prolonged, high-load operation, I plan to switch to a more heat-resistant material—such as Siraya Tech Sculpt High Temp, which can withstand temperatures ranging from 180°C to 250°C.
#Hardware #3Dprinting #KVM #BuildInPublic

I’ve just released a video on how I made the USBridge KVM completely silent! 🤫
Take a look at the evolution of its cooling system: from a noisy 40mm fan to optimized firmware and passive cooling that keeps temperatures around 65°C, even under peak load.
youtu.be/A0cC-6mO2vU
I’ve overhauled the cooling system, switching it from active to completely passive. No more fan noise or unnecessary moving parts!
I replaced the original 0.5 cm tall heatsink with a more substantial 1 cm version, which allows for effective heat dissipation via natural convection.
I also optimized the software and processor load to reduce heat generation during peak tasks. As a result, the USBridge KVM maintains excellent operating temperatures: under maximum load, the processor stays stable at around 65°C, and at idle, it sits at about 40°C. What do you think?
My primary objective right now is to build a unique remote access ecosystem that integrates the best software streaming protocols and hardware-based KVM solutions into a single, unified client.
Software Agent
This hub brings together top-tier protocols and streaming tools, eliminating the need to choose just one or struggle with complex network setup and configuration. It currently features my own custom protocol—written in Rust and dubbed USBridge Streamer—alongside popular open-source solutions like Sunshine, PunkFunk, and Vibepollo.
The system delivers 4K @ 120 FPS streaming with the lowest possible latency. It includes full USB passthrough, support for gamepads and MIDI devices, and everything required for graphic design (including Wacom tablet support with pressure/tilt sensitivity and accurate 4:4:4 color reproduction). It comes with built-in Tailscale for global connectivity, an integrated protocol benchmark (allowing you to test which protocol performs best on your specific hardware and network setup in under a minute), AI-vision capabilities, MCP (Model Context Protocol) integration, virtual displays, and clipboard synchronization.
Hardware Agent
You can also connect KVM-over-IP hardware to the same USBridge client used for software-based remote access. This includes my custom USBridge 2.0 KVM, which can read BIOS screens and convert them into text via OCR—all with a latency of just ~25ms at 1080p 60 FPS. You can even build your own DIY KVM using hardware you already have on hand (configurations for Radxa boards are currently available, with support for more boards in development) or by using the widely available, ultra-affordable Nano KVM. I’ve upgraded my USBridg firmware to the point where the Nano KVM now delivers a crisp 1080p signal at 60 fps. It supports gamepads, Tailscale (getting it optimized for the Nano KVM—which only has a single core—was quite a challenge!), and audio.

For those interested in giving it a try: the software component is open-source, and the KVM firmware operates on a free-trial model (24 hours of full-featured testing). github.com/USBridge-Technolo…
If you ever need to reinstall it, no problem—you can just set it up again, and it’s good to go. What do you think about this approach—combining software with a physical KVM in a single client?

Turned a cheap Nano KVM into a 1080p@60FPS gaming monster with ultra-low latency (~20ms)! 🚀
✅ Gamepad passthrough & audio
✅ Optimized Tailscale for single-core CPU
✅ USBridge custom firmware
Full DIY guide on @hacksterio 👇
hackster.io/USBridge/upgrade…

I had to put quite a bit of work into optimizing Tailscale today!
Since the Nano KVM runs on a low-power single-core processor, Tailscale was consuming too many resources, which caused the video stream to stutter. After some fine-tuning, everything is running perfectly smoothly—no lag and no drops in FPS!
Quick look at the USBridge KVM 2.0 Ultimate Pro kit ($139). Interactive screen, active cooling, ATX power control, and capture card out of the box. Plus, custom modules and standard kits are now live on the site!
#homelab #selfhosted #sysadmin #tech #hardware #remoteaccess #gaming #pcmr #developer #diy